When you create a new Debian 8 server, there are a few steps required as part of the basic setup.
1) Install SSH (if not already configured)
You can use the package manager for Debian / Ubuntu via the dpkg command. To find out if SSH is installed run dpkg -s openssh-server . Alternatively, try ssh localhost . If you see command not found, it’s not installed. To install the service run apt-get install openssh-server
2) Create a new user account and add to the sudo group
It is often recommended that no one use root as their normal user account. Simple errors in entering commands can cause major damage to the system. Instead set up a super user. This will allow a normal user to run admin commands by putting the word sudo before each command.
Debian 8 doesn’t normally come with sudo installed. You can check using dpkg -s sudo .
Update the apt package index first using apt-get update , then use apt-get install sudo to install sudo.
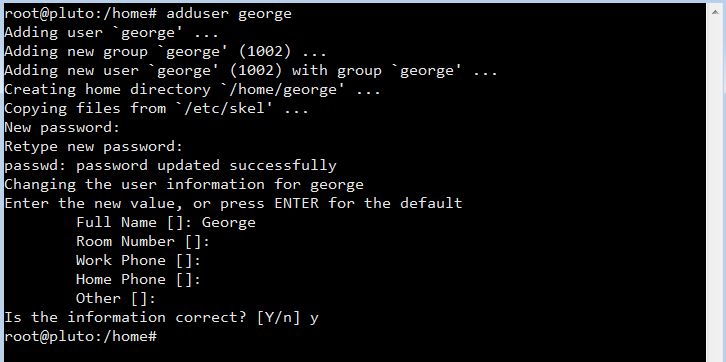
Next create a new user, for example “george” but use any name you like, using the adduser command. Enter a strong password and enter any other information (optional), just press enter to skip.

To grant sudo privileges to the new user, you need to add the user to the “sudo” group. By the way sudo is an abbreviation of “super user do”. Run this command as root to add the user “george” to the sudo group usermod -a -G sudo george
Disabling remote root login is recommend. To block remote SSH access to the root account, open the SSH daemon configuration file nano /etc/ssh/sshd_config and find the line PermitRootLogin yes . Change the “yes” to “no”, save the file (CTRL + o) and restart SSH using systemctl restart ssh or service ssh restart or /etc/init.d/ssh restart .
3) Firewall. Configuring iptables on Debian 8
Debian servers do not implement any restrictions by default. Check the current iptable rules using the following command iptables -L

There are three default chains: INPUT, OUTPUT and FORWARD. You don’t see any rules because Debian 8 doesn’t ship with a default rule set. The chain names indicate which traffic the rules in each list will be applied to: INPUT is for any connections coming in to the server, OUTPUT is for traffic leaving the server and FORWARD is for any pass through. Each chain also has a policy setting which determines how the traffic is handled, if it doesn’t match any specific rules, by default it is set to accept.
Note, iptables controls five different tables: filter, nat, mangle, raw and security. If you don’t specifiy a table, the filter table is used as the default. For example, the view the nat table use iptables -t nat -L
The recommended firewall approach is to define rules for allowed traffic and block everything else.
You can view the output in a format that reflects the commands necessary to enable each rule / policy by using the -S flag iptables -S

If you have rules configured and wish to start again, you can flush all current rules using iptables -F . Make sure the default policy on the INPUT and OUTPUT changes are set to ACCEPT before flushing the rules.
iptables -P INPUT ACCEPT
iptables -P OUTPUT ACCEPT
iptables -F
To begin using iptables you should first add rules for allowed inbound traffic. iptables can track the state of the connection, use this command to allow established connections (i.e. our SSH connection):
iptables -A INPUT -m conntrack --ctstate ESTABLISHED,RELATED -J ACCEPT
You can check that the rule was added using the iptables -L command.
Next allow traffic to a specified port to enable SSH connections with the following
iptables -A INPUT -p tcp --dport ssh -j ACCEPT
The ssh in the command translates to port 22. To enable traffic for FTP use
iptables -A INPUT -p tcp --dport 21 -j ACCEPT
It’s important to add a rule for the loopback interface
iptables -I INPUT 1 -i lo -j ACCEPT
After adding all the allowed rules, change the input policy to drop
iptables -P INPUT DROP
- -A flag appends a rule to the end of the chain
- -I flag inserts a rule, in our example -I INPUT 1 inserts the rule in the 1st position of the input chain.
- -m conntrack and –ctstate conntrack stores the connection state of known connections
- –dport is the destination port flag (requires -p tcp )
Now if you were to restart the server all of these iptable configurations would be wiped. To prevent this, save the rules to a file iptables-save > /etc/iptables/rules.v4 .
You can restore the saved rules after a reboot by reading the saved file with iptables-restore < /etc/iptables/rules.v4 .
You can automate the restore process at reboot by installing an additional package for iptables via apt-get install iptables-persistent . After the installation the setup will ask to save IPv4 and IPv6 rules.
If you make changes to rules, remember to save them using the above command. The iptables-persistent command looks for the files rules.v4 and rules.v6 under /etc/iptables/ .
Alternatively, you can save your filewall rules with this command invoke-rc.d iptables-persistent save
